基于之前的版本更新.
如何有效设计分布式系统
结合实例分享分布式系统架构设计的经验
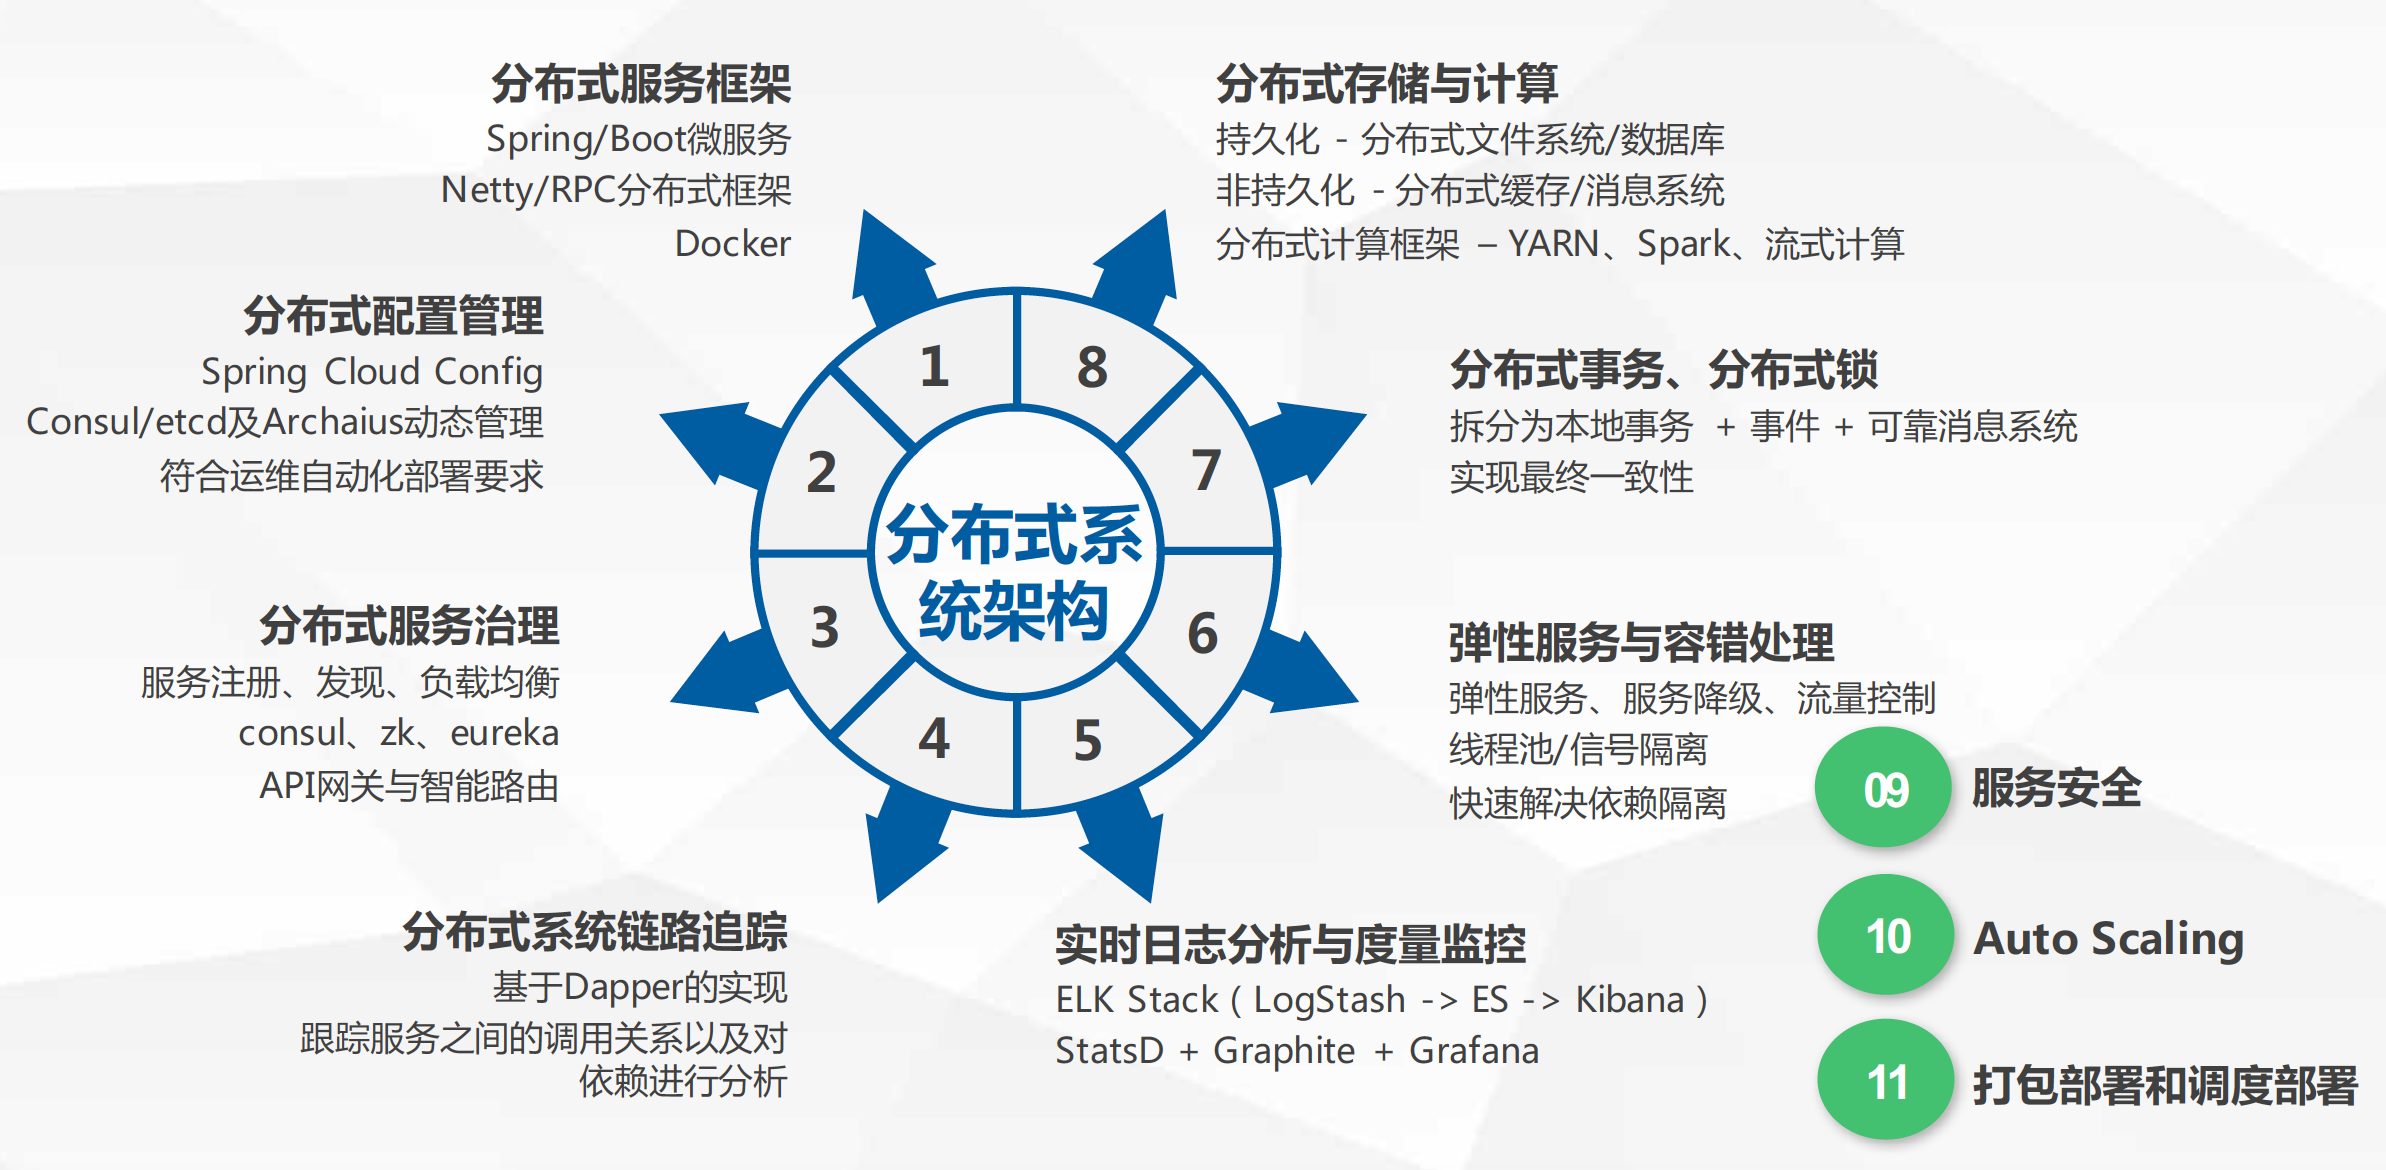
分布式配置管理
配置的集中管理:采用consul的KV,将所有微服务的application.properties中的配置内容存入consul。
配置的动态管理:采用archaius,将consul上的配置信息读到spring的PropertySource和archaius的PollResult中,当修改了配置信息后,经常改变的值通过DynamicFactory来获取,不经常改变的值可以通过其他方式获取. 大部分情况下,修改了consul上的配置信息后,相应的项目不需要重启,也会读到最新的值。
Spring Cloud Config
- 集中管理的需求:一个使用微服务架构的应用系统可能会包括成百上千个微服务,因此集中管理很有必要
- 不同环境不同配置:例如数据源在不同的环境(开发,测试,生产)是不同的
- 运行期间可以动态调整。例如根据各个微服务的负载状况,动态调整数据源连接池大小或者熔断阀值,并且调整时不停止微服务
- 配置修改后可以自动更新
Spring Cloud Config主要是为了分布式系统的外部配置提供了服务器端和客户端的支持,只要包括Config Server和Config Client两部分。由于Config Server和Config Client都实现了对Spring Environment和PropertySource抽象的映射,因此Spring Cloud Config很适合spring应用程序。
- Config Server: 是一个看横向扩展的,集中式的配置服务器,它用于集中管理应用程序各个环境下配置,默认使用Git存储配置内容。
- Config Client: 是一个Config Server的客户端,用于操作存储在Config Server上的配置属性,所有微服务都指向Config Server,启动的时候会请求它获取所需要的配置属性,然后缓存这些属性以提高性能。
尽管使用/refresh 端点手动刷新配置,但是如果所有微服务节点的配置都需要手动去刷新的话,那必然是一个繁琐的工作,并且随着系统的不断扩张,会变得越来越难以维护。因此,实现配置的自动刷新是很有必要的,Spring Cloud Bus实现配置的自动刷新机制是一旦接收到RefreshEvent,就会启动ContextRefresher.refresh。
RefreshEventListener
|
|
Spring Cloud Bus提供了批量刷新配置的机制,它使用轻量级的消息代理(例如RabbitMQ、Kafka等)连接分布式系统的节点,这样就可以通过Spring Cloud Bus广播配置的变化或者其他的管理指令。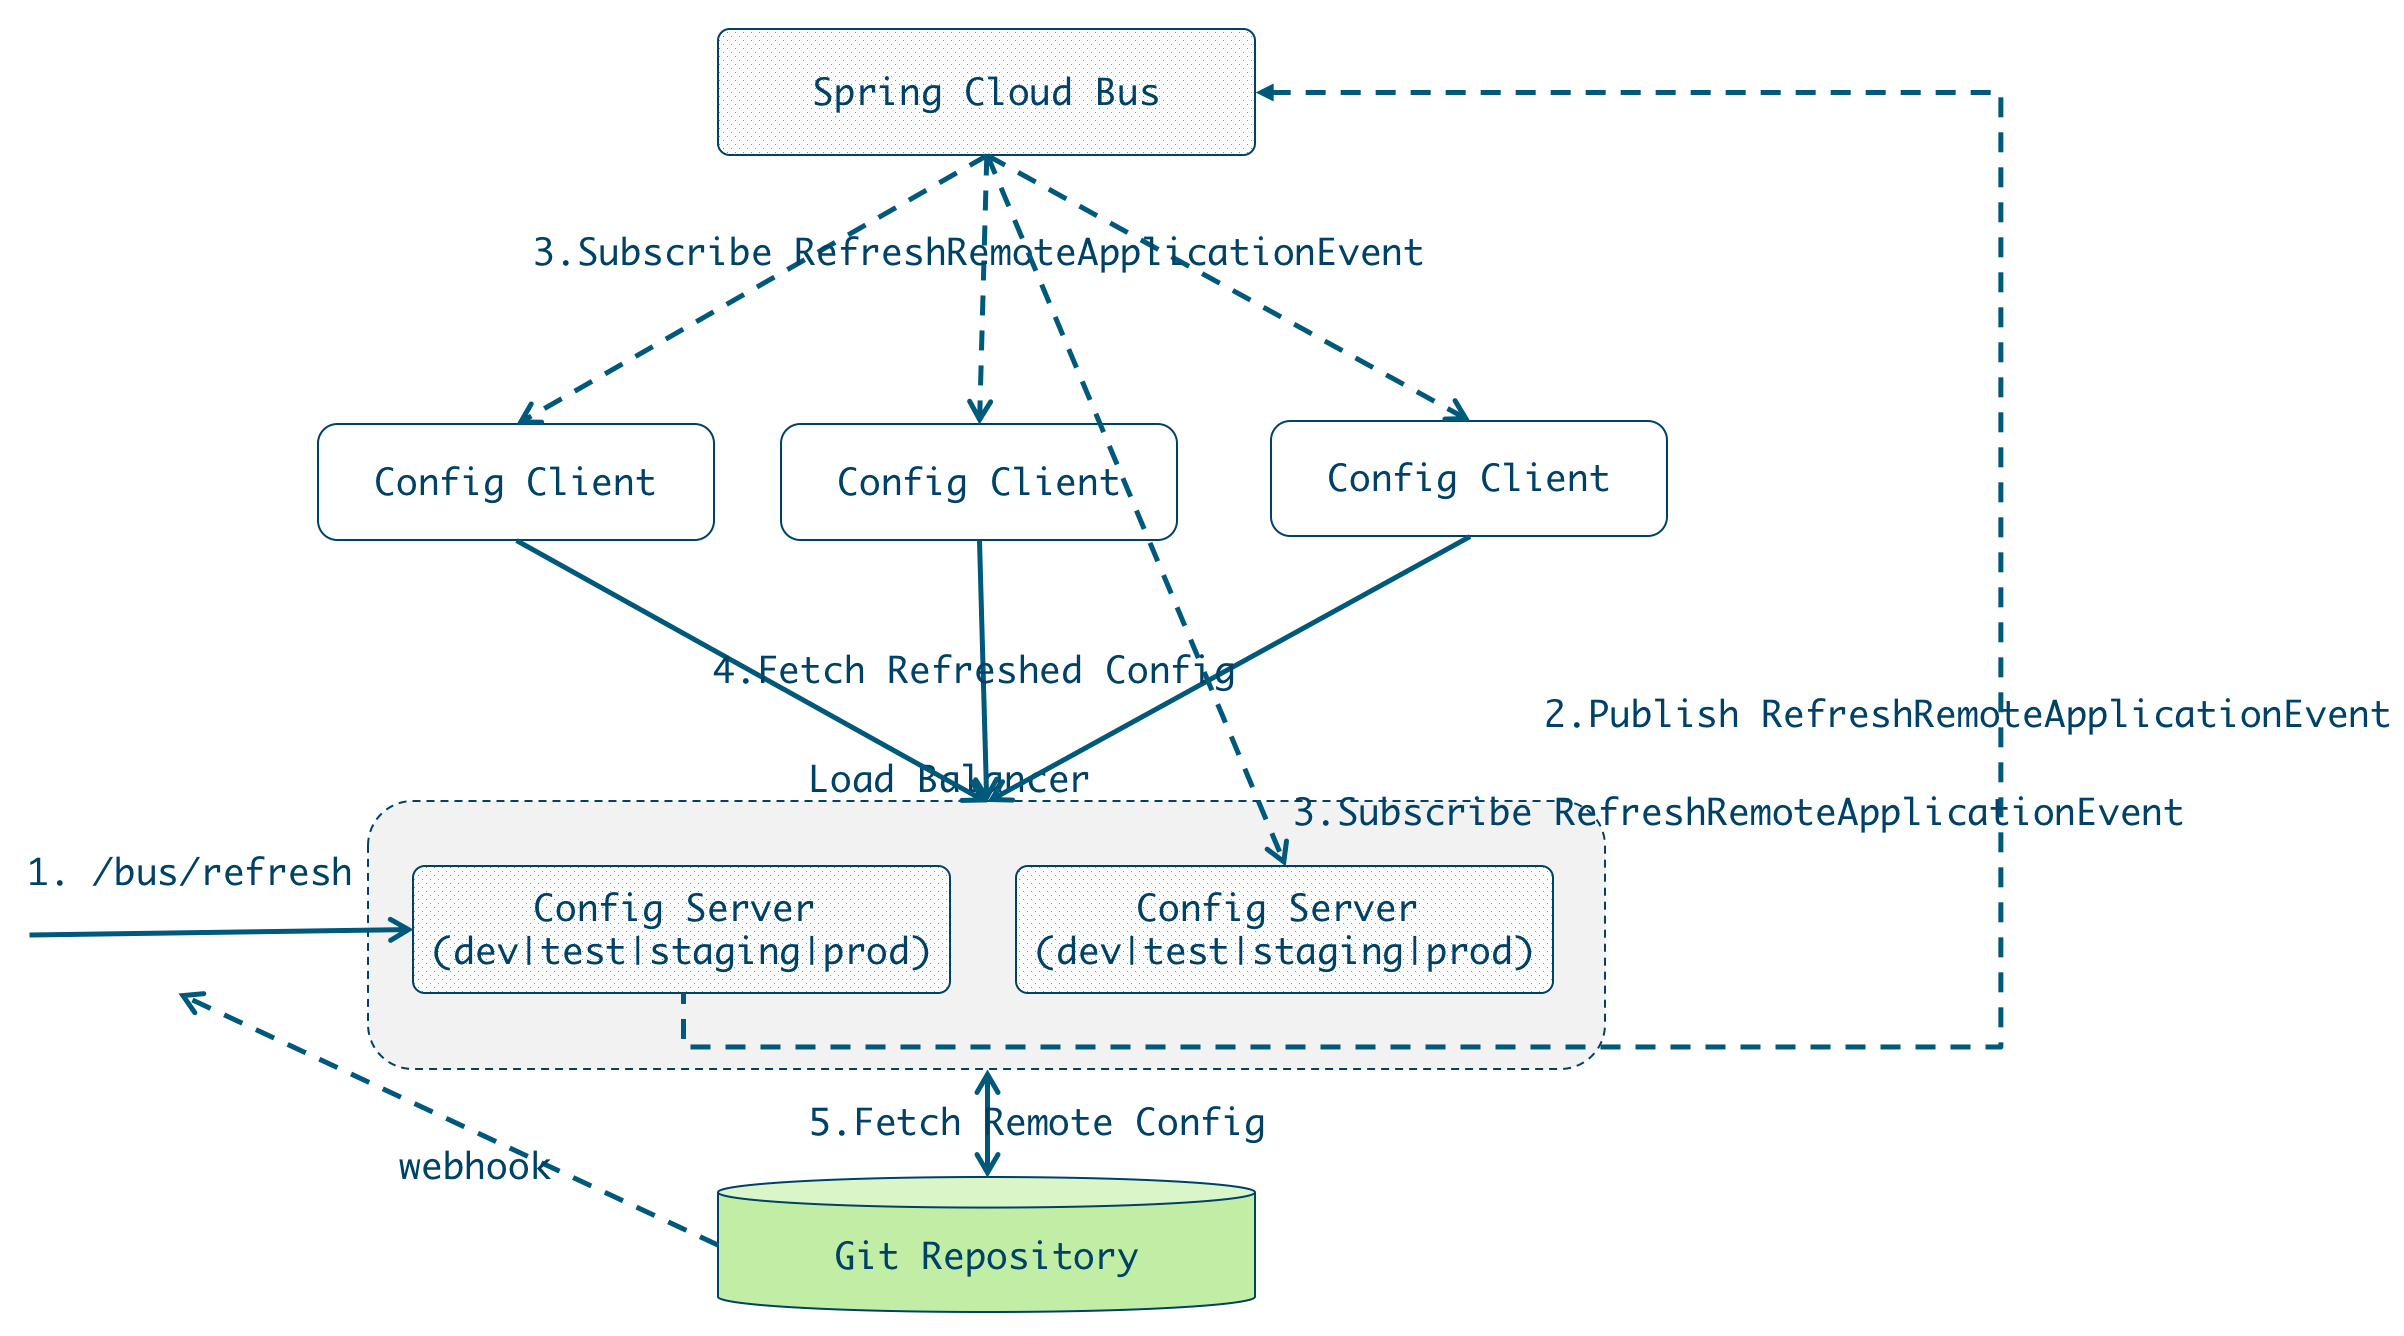
代码可以参考: https://github.com/osswangxining/spring-cloud-config/tree/1.4.x
具体操作如下:
启动RabiitMQ (作为Spring Cloud Bus,也可以选择Kafka):
|
|
git clone spring-cloud-config, 我使用了1.4.1.BUILD-SNAPSHOT;注意,2.x开始spring-cloud-bus均有变化,截止目前版本还不稳定。
|
|
启动config server
|
|
如果启动多个config server, 可以通过修改端口实现:-Dserver.port=9999
查看运行结果:
运行spring-cloud-config-sample
如果config server启用了HA,例如通过nginx做负载均衡,那么bootstrap.yml文件中的spring.cloud.config.uri应该指向nginx暴露的地址。
|
|
查看运行结果:
如果出现如下信息,则是需要修改security配置。
在config client/server的yml文件添加:
手工或者通过git repository的webhook自动触发
手工触发:curl -X POST {nginx | localhost:8888}/admin/bus/refresh
一旦某个config server上/bus/refresh被触发,则该config server会向spring cloud bus发布RefreshRemoteApplicationEvent事件。
与此同时,其他的config server和config client会接收到该事件进行刷新,执行如下逻辑:
分布式服务治理
服务注册与发现
- Consul
- Eureka | Zookeeper | etcd 对比
- Kubernetes Service
负载均衡
- Netflix Ribbon(Spring Cloud)
-
客户端负载均衡的常用算法如下:
- 1.Round Robbin(轮询)
- 最古老的算法最可信的算法,缺点是有状态,必须在并发之下记住上一次到谁了。
- 2.Random(随机)
- 最简单的,无状态的算法。
- 3.Least Load(最小负载)
- 可以实现某种程度上的智能调节。具体的实现包括最少在途请求数(发出去了还没收到应答的请求),最少并发连接数,最小平均响应时间等等。
- 4.Hash (参数哈希)
- 根据参数进行哈希,一来有分区的效果(参见单元化架构,可改善数据库连接,缓存热度等),二来可以Stick Session(可本机进行防刷运算等)
- 1.Round Robbin(轮询)
API网关与智能路由
- Netflix Zuul(SpringCloud)
- Kubernetes Service
-
[Gateway]
分布式系统链路追踪
- Zipkin
SpringCloud Sleuth
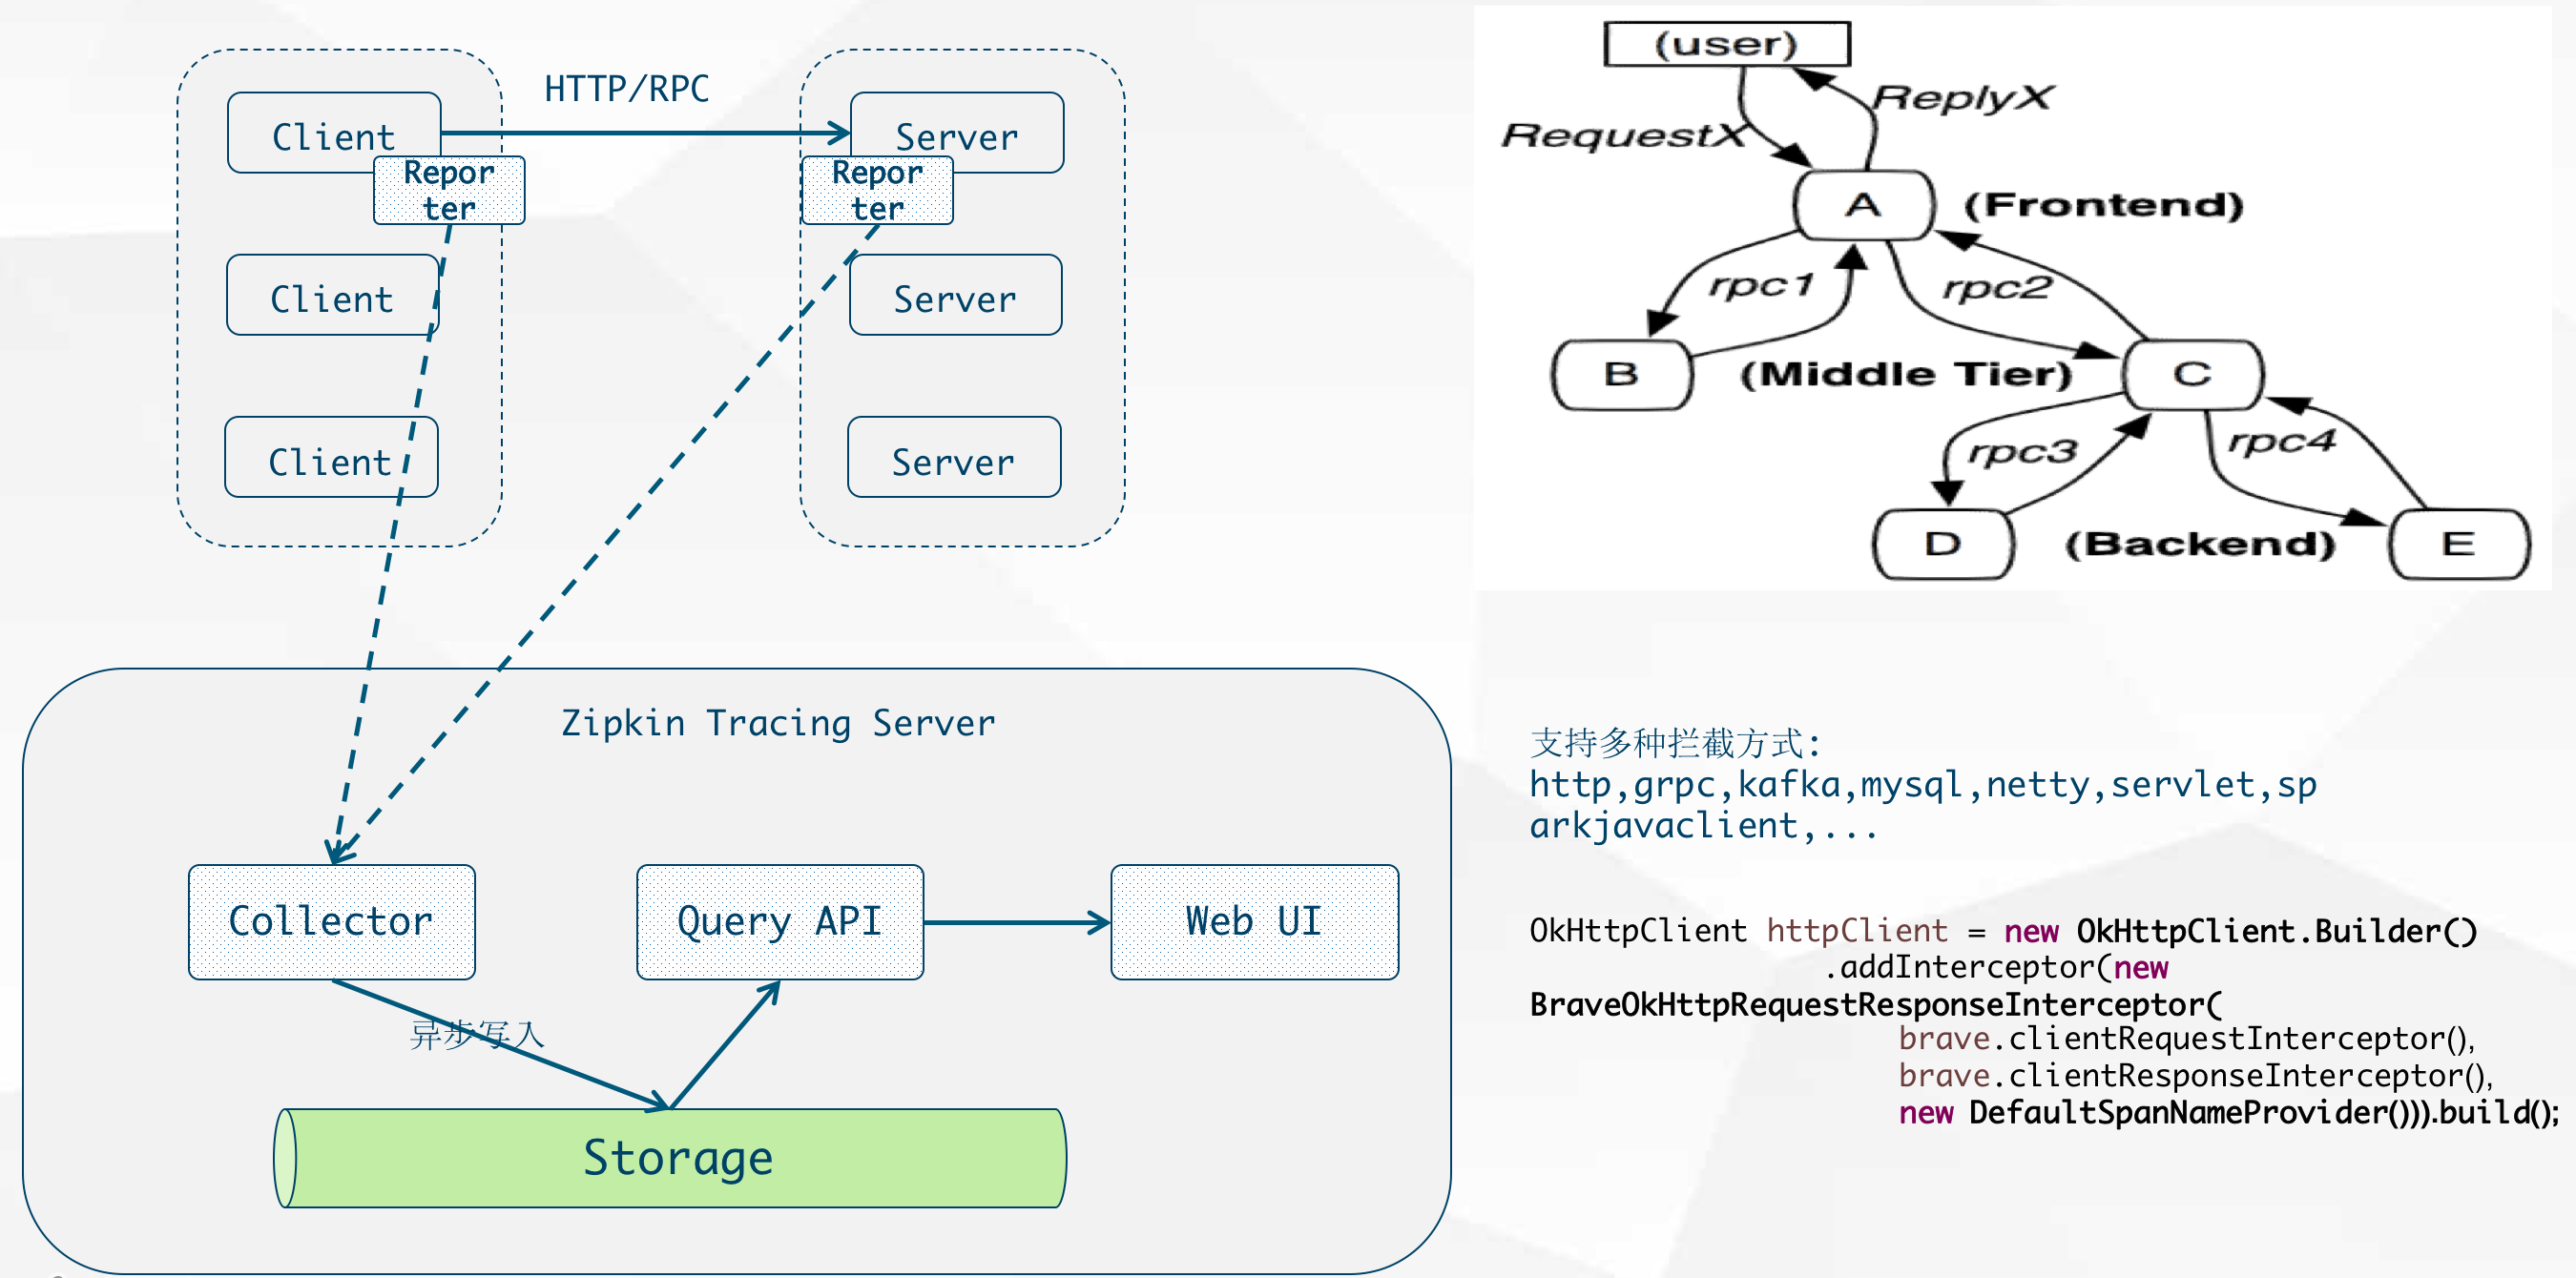
Zipkin is a distributed tracing system. It helps gather timing data needed to troubleshoot latency problems in microservice architectures. It manages both the collection and lookup of this data. Zipkin’s design is based on the Google Dapper paper.
Applications are instrumented to report timing data to Zipkin. The Zipkin UI also presents a Dependency diagram showing how many traced requests went through each application. If you are troubleshooting latency problems or errors, you can filter or sort all traces based on the application, length of trace, annotation, or timestamp. Once you select a trace, you can see the percentage of the total trace time each span takes which allows you to identify the problem application.
实时日志分析与度量监控
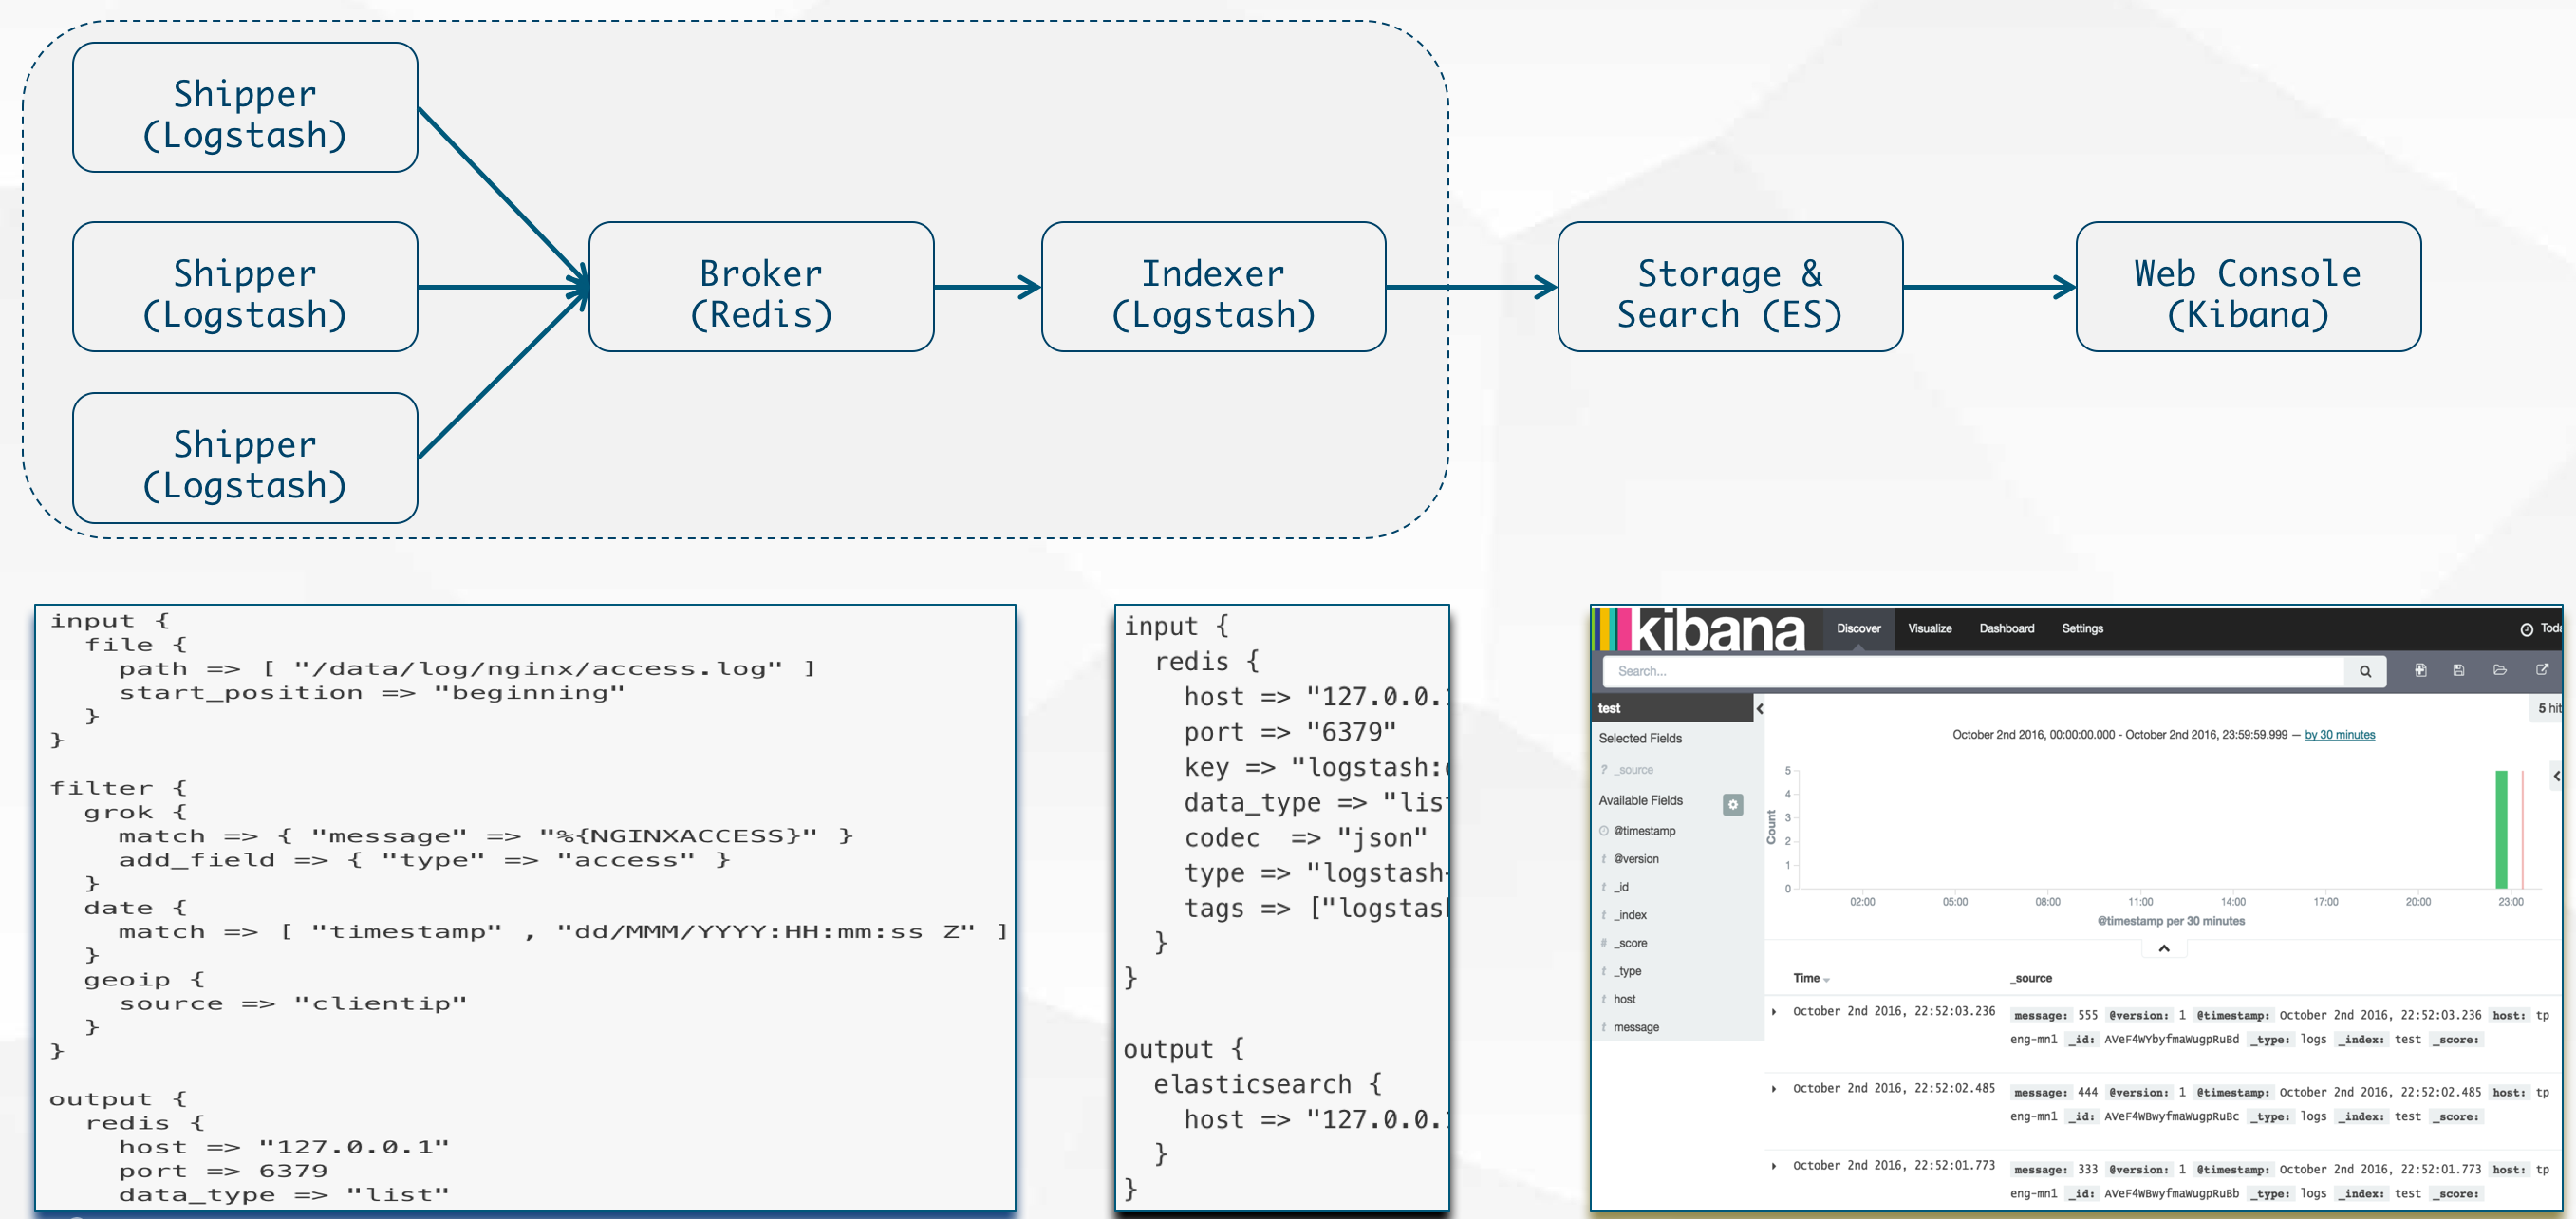
日志管理
ELK Stack(LogStash -> ES -> Kibana)
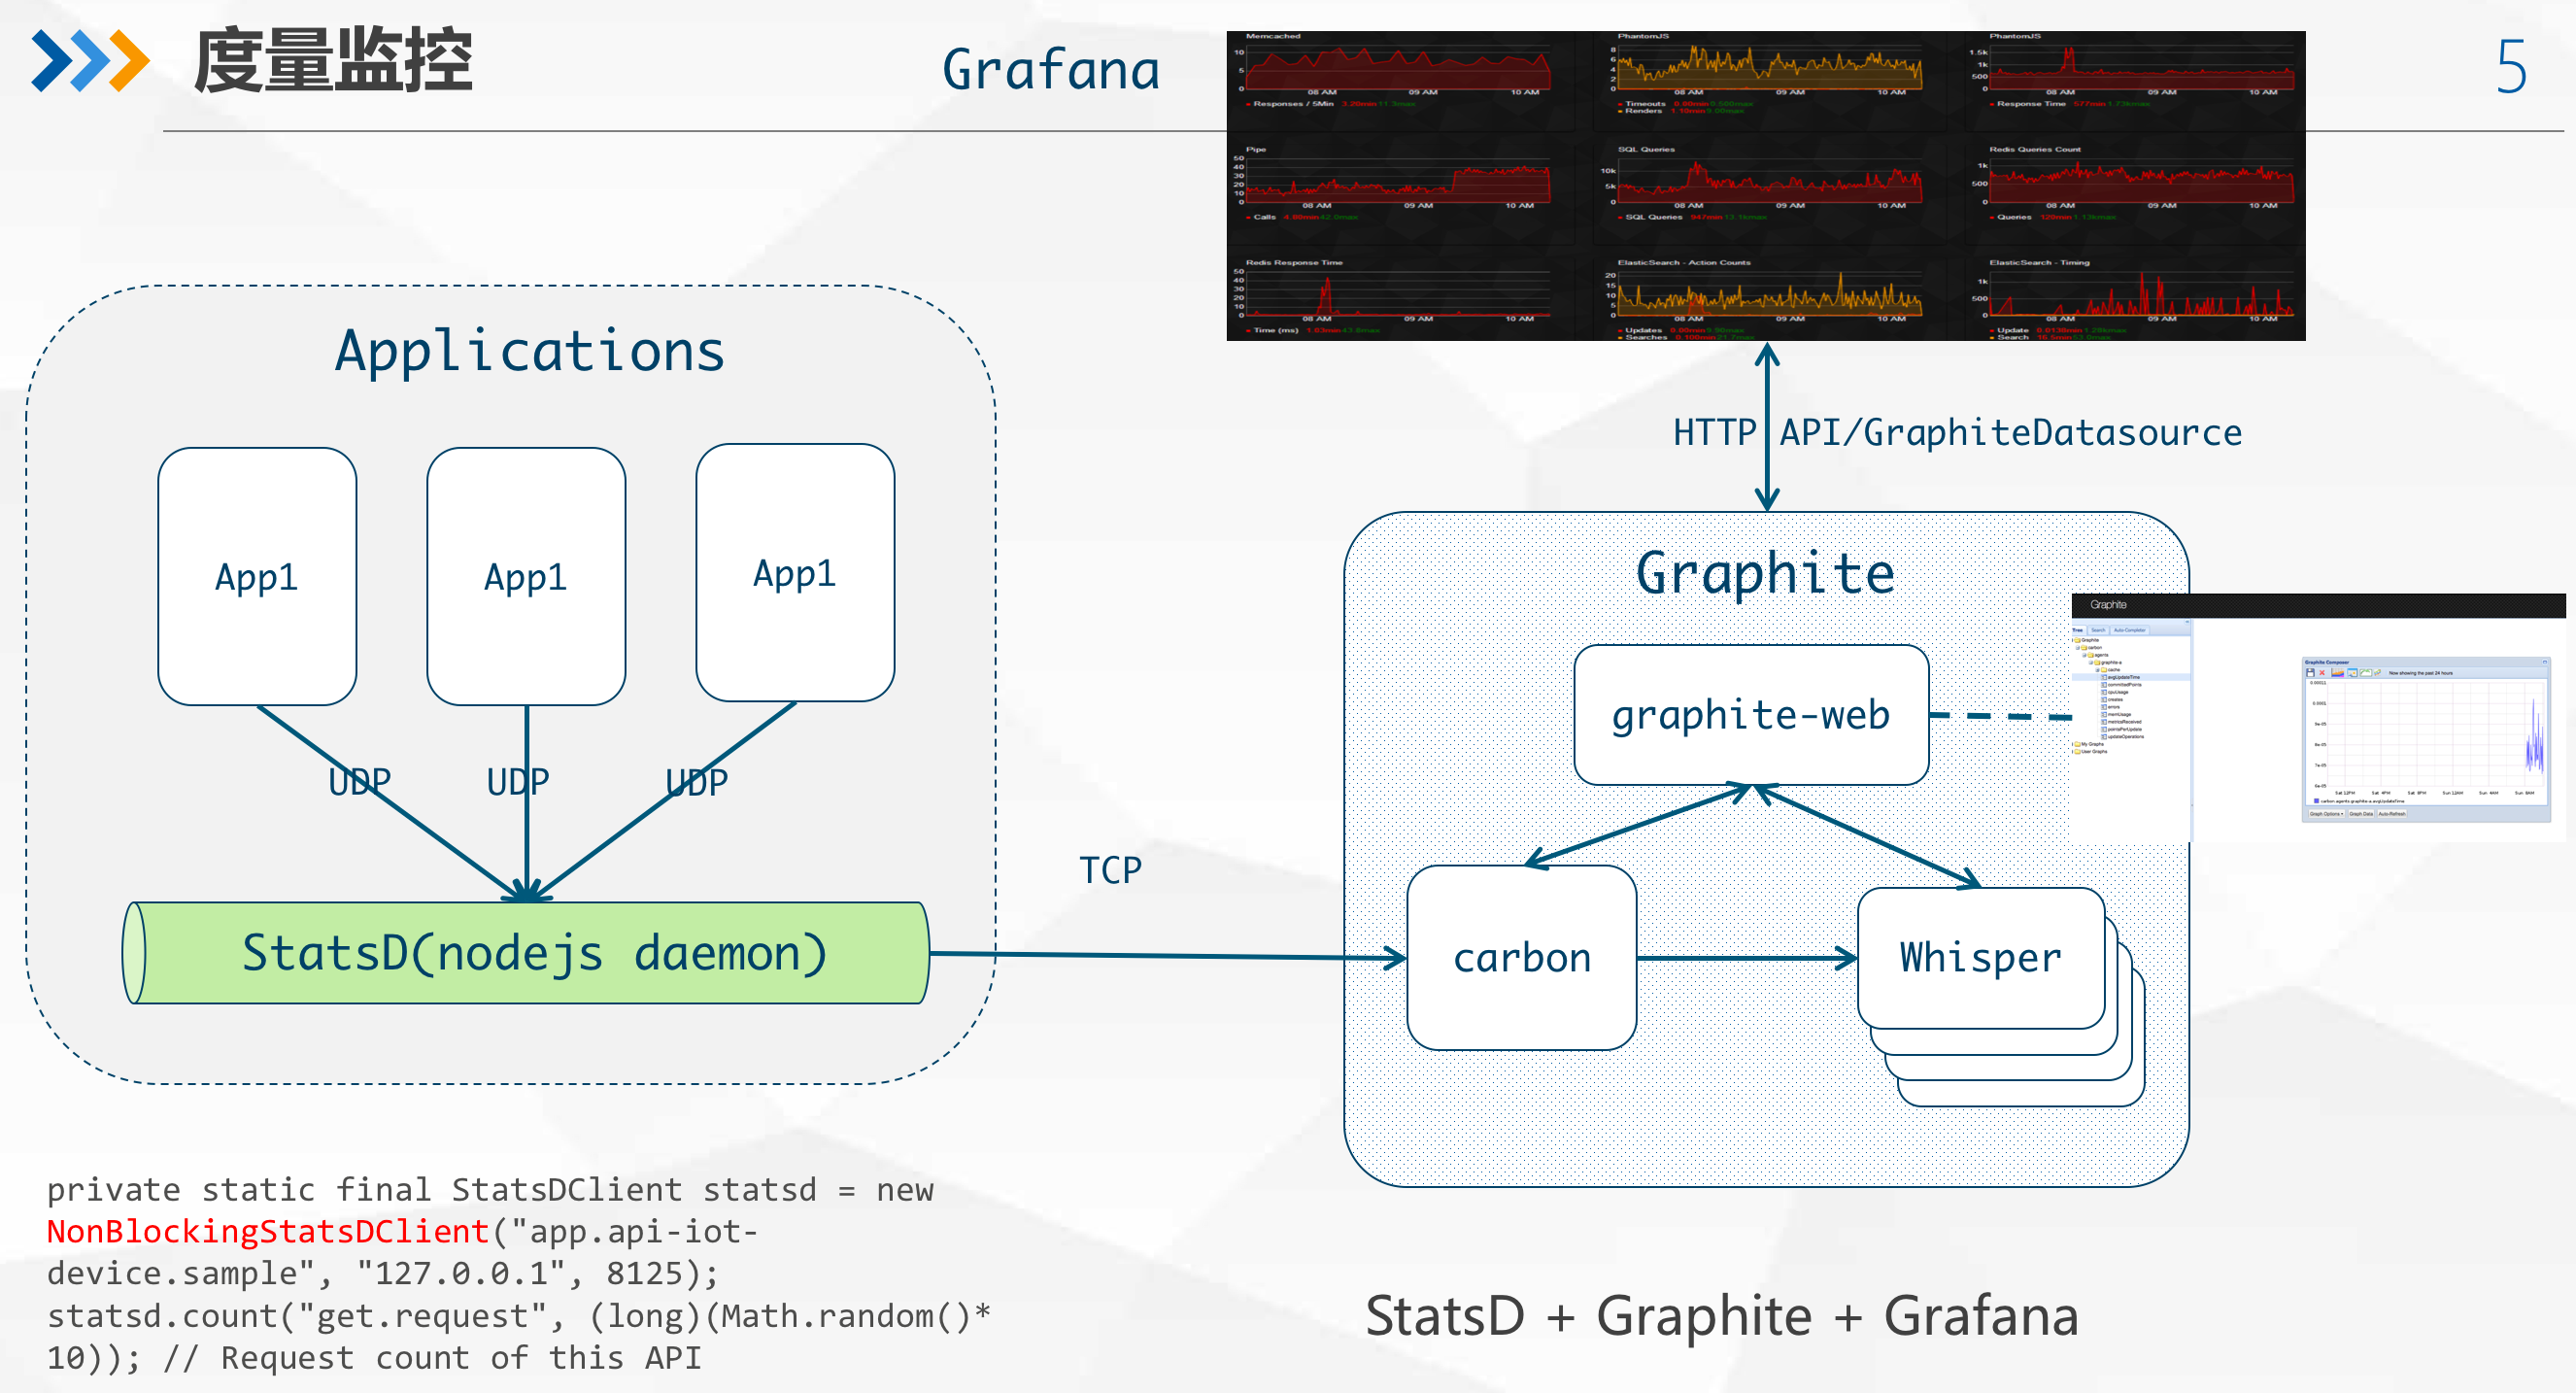
监控与度量
Application/Infrastructure monitoring using StatsD + Graphite + Grafana
弹性服务与容错处理
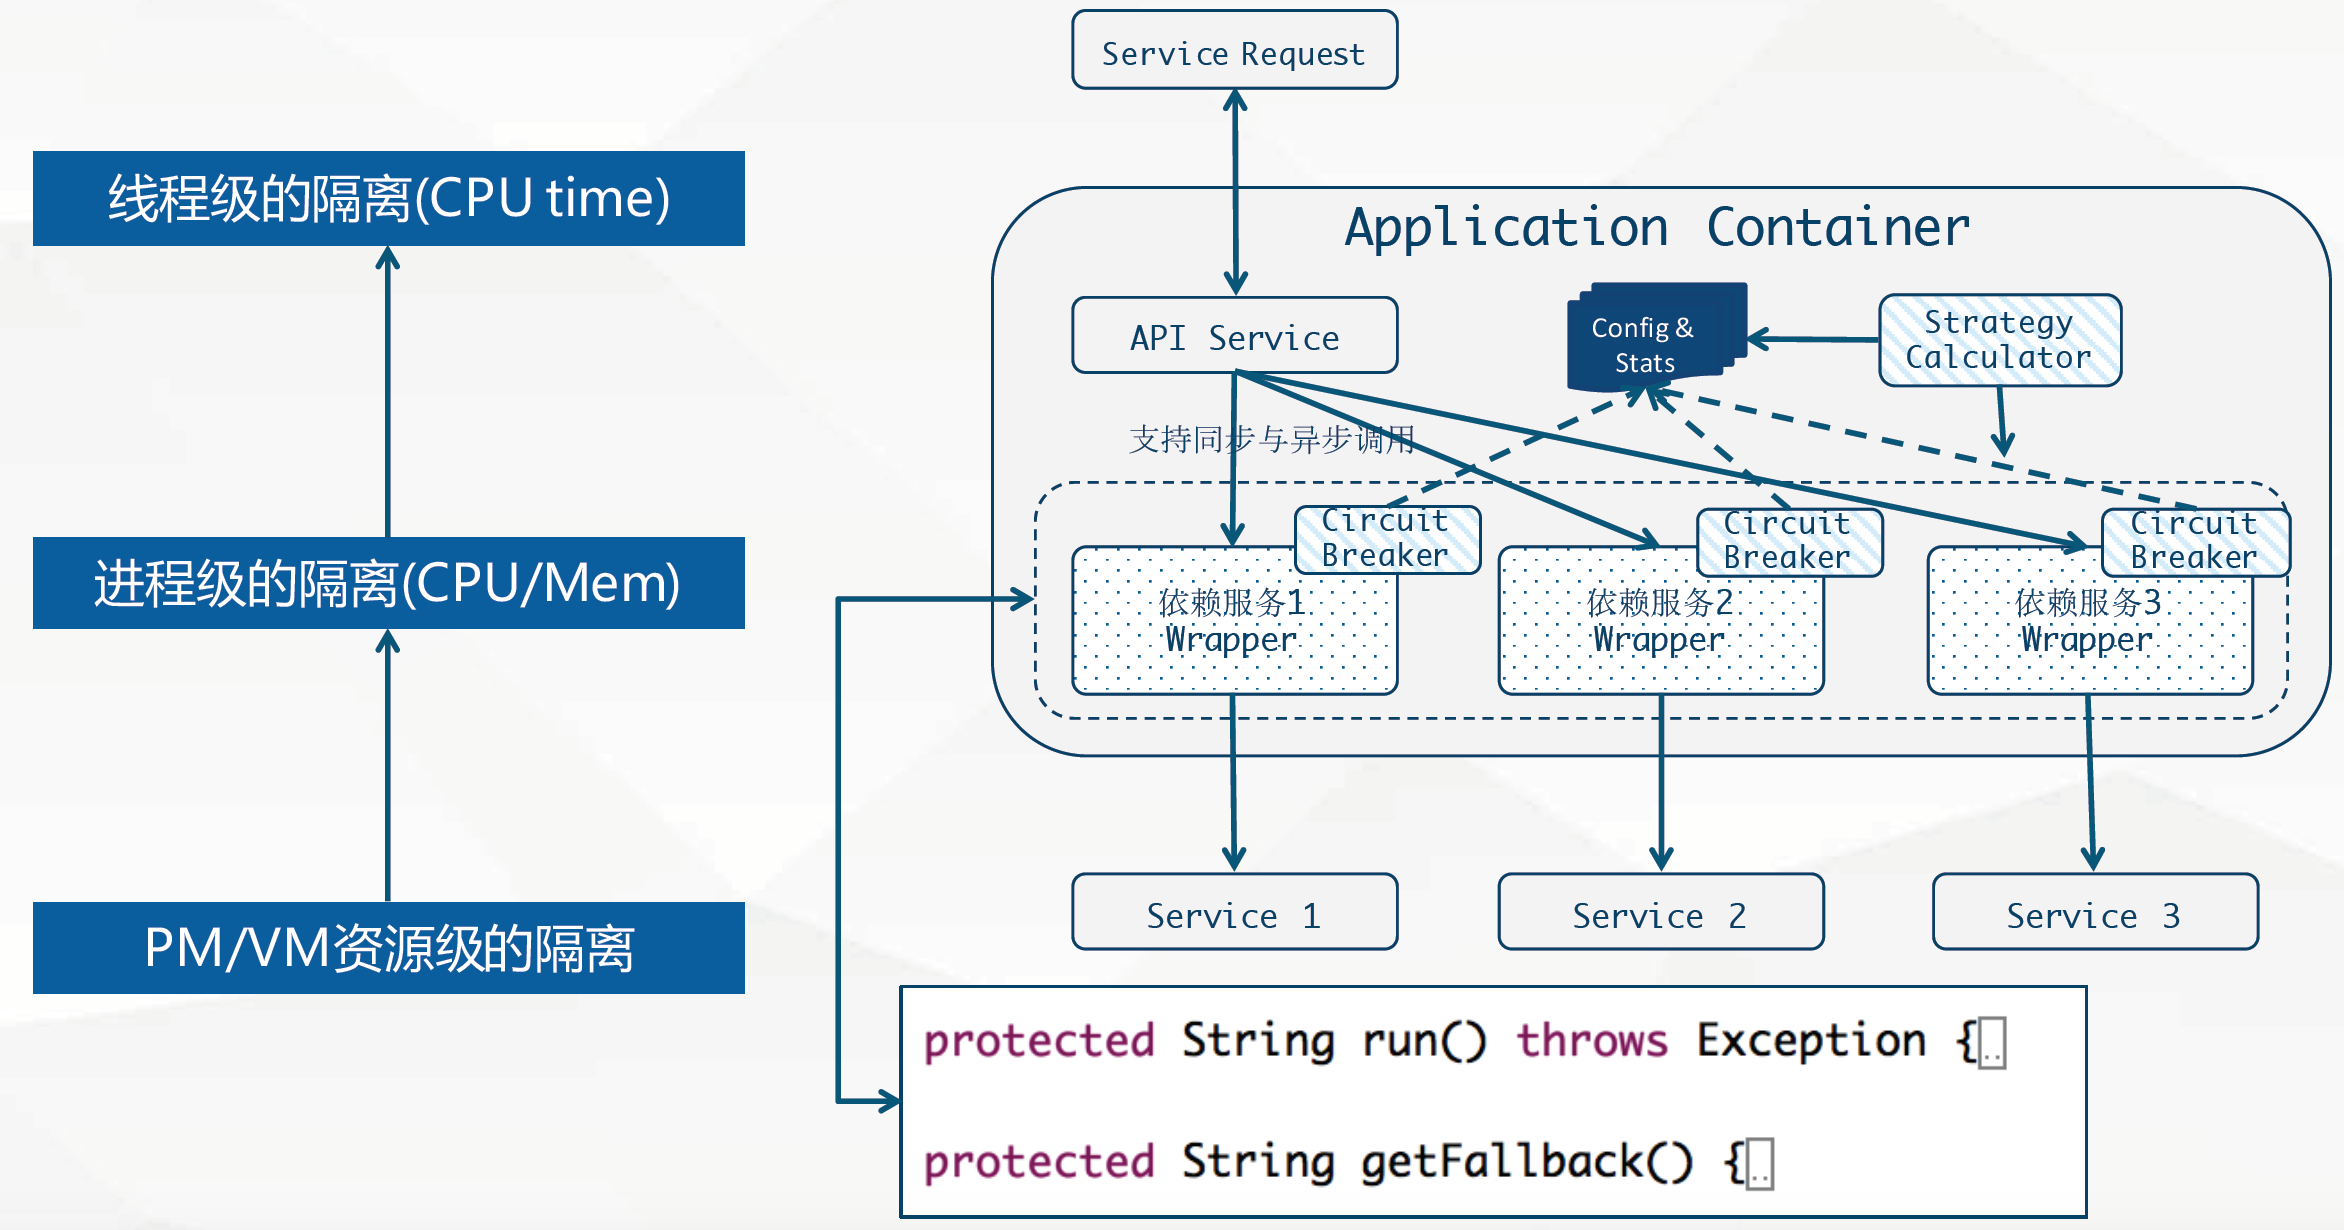
Hystrix架构设计
- 弹性服务
- Hystrix可以为分布式服务提供弹性保护,通过命令模式封装调用,来实现弹性保护,继承HystrixCommand并且实现run方法,就完成了最简单的封装。
- 实现getFallBack方法可以为熔断或者异常提供后备处理方法。
- 服务降级
- 提供熔断器组件,可以自动运行或手动调用,停止当前依赖一段时间(10秒),熔断器默认 错误 率阈值为50%,超过将自动运行。
- 线程池/信号隔离
- 为每个依赖提供一个小的线程池(或信号),如果线程池已满调用将被立即拒绝,默认不采用排队.加速失败判定时间。
- 快速解决依赖隔离
- 可配置依赖调用 超时 时间,超时时间一般设为比99.5%平均时间略高即可.当调用超时时,直接返回或执行fallback逻辑。
弹性服务与容错处理的本质就是指使用命令模式(如HystrixCommand)包装依赖调用逻辑,每个命令在单独线程中/信号授权下执行。
单个应用的熔断监控
代码参见: https://github.com/osswangxining/resilience-dependencyisolation-spring-boot
在使用Spring Boot添加依赖时,需要注意spring-boot-starter-actuator,否则就不能访问hystrix的一些endpoint,如:
- 提供hystrix 监控界面的http://{ip}:{port}/hystrix
- 以及返回流式数据的API: http://{ip}:{port}/hystrix.stream 等。
|
|
Turbine
在复杂的分布式系统中,相同服务的节点经常需要部署上百甚至上千个,很多时候,运维人员希望能够把相同服务的节点状态以一个整体集群的形式展现出来,这样可以更好的把握整个系统的状态。 为此,Netflix提供了一个开源项目(Turbine)来提供把多个hystrix.stream的内容聚合为一个数据源供Dashboard展示。
- 添加依赖, 包括2个trubine相关的依赖:12345678<dependency><groupId>org.springframework.cloud</groupId><artifactId>spring-cloud-starter-turbine</artifactId></dependency><dependency><groupId>org.springframework.cloud</groupId><artifactId>spring-cloud-netflix-turbine</artifactId></dependency>
代码参见: https://github.com/osswangxining/resilience-dependencyisolation-spring-boot
配置文件
123456spring.application.name=hystrix-dashboard-turbineserver.port=6688turbine.appConfig=node01,node02turbine.aggregator.clusterConfig= defaultturbine.clusterNameExpression= new String("default")turbine.combine-host-port=true- turbine.appConfig :配置Eureka中的serviceId列表,表明监控哪些服务
- turbine.aggregator.clusterConfig :指定聚合哪些集群,多个使用”,”分割,默认为default。可使用http://.../turbine.stream?cluster={clusterConfig之一}访问
- turbine.clusterNameExpression :参数指定了集群名称为default,当我们服务数量非常多的时候,可以启动多个Turbine服务来构建不同的聚合集群,而该参数可以用来区分这些不同的聚合集群,同时该参数值可以在Hystrix仪表盘中用来定位不同的聚合集群,只需要在Hystrix Stream的URL中通过cluster参数来指定;
- turbine.combine-host-port参数设置为true,可以让同一主机上的服务通过主机名与端口号的组合来进行区分,默认情况下会以host来区分不同的服务,这会使得在本地调试的时候,本机上的不同服务聚合成一个服务来统计。
默认情况下是通过HTTP收集聚合
此外可以通过消息代理收集聚合
- 可以将所有需要收集的监控信息都输出到消息代理中,然后Turbine服务再从消息代理中异步的获取这些监控信息,最后将这些监控信息聚合并输出到Hystrix Dashboard中。
流量控制
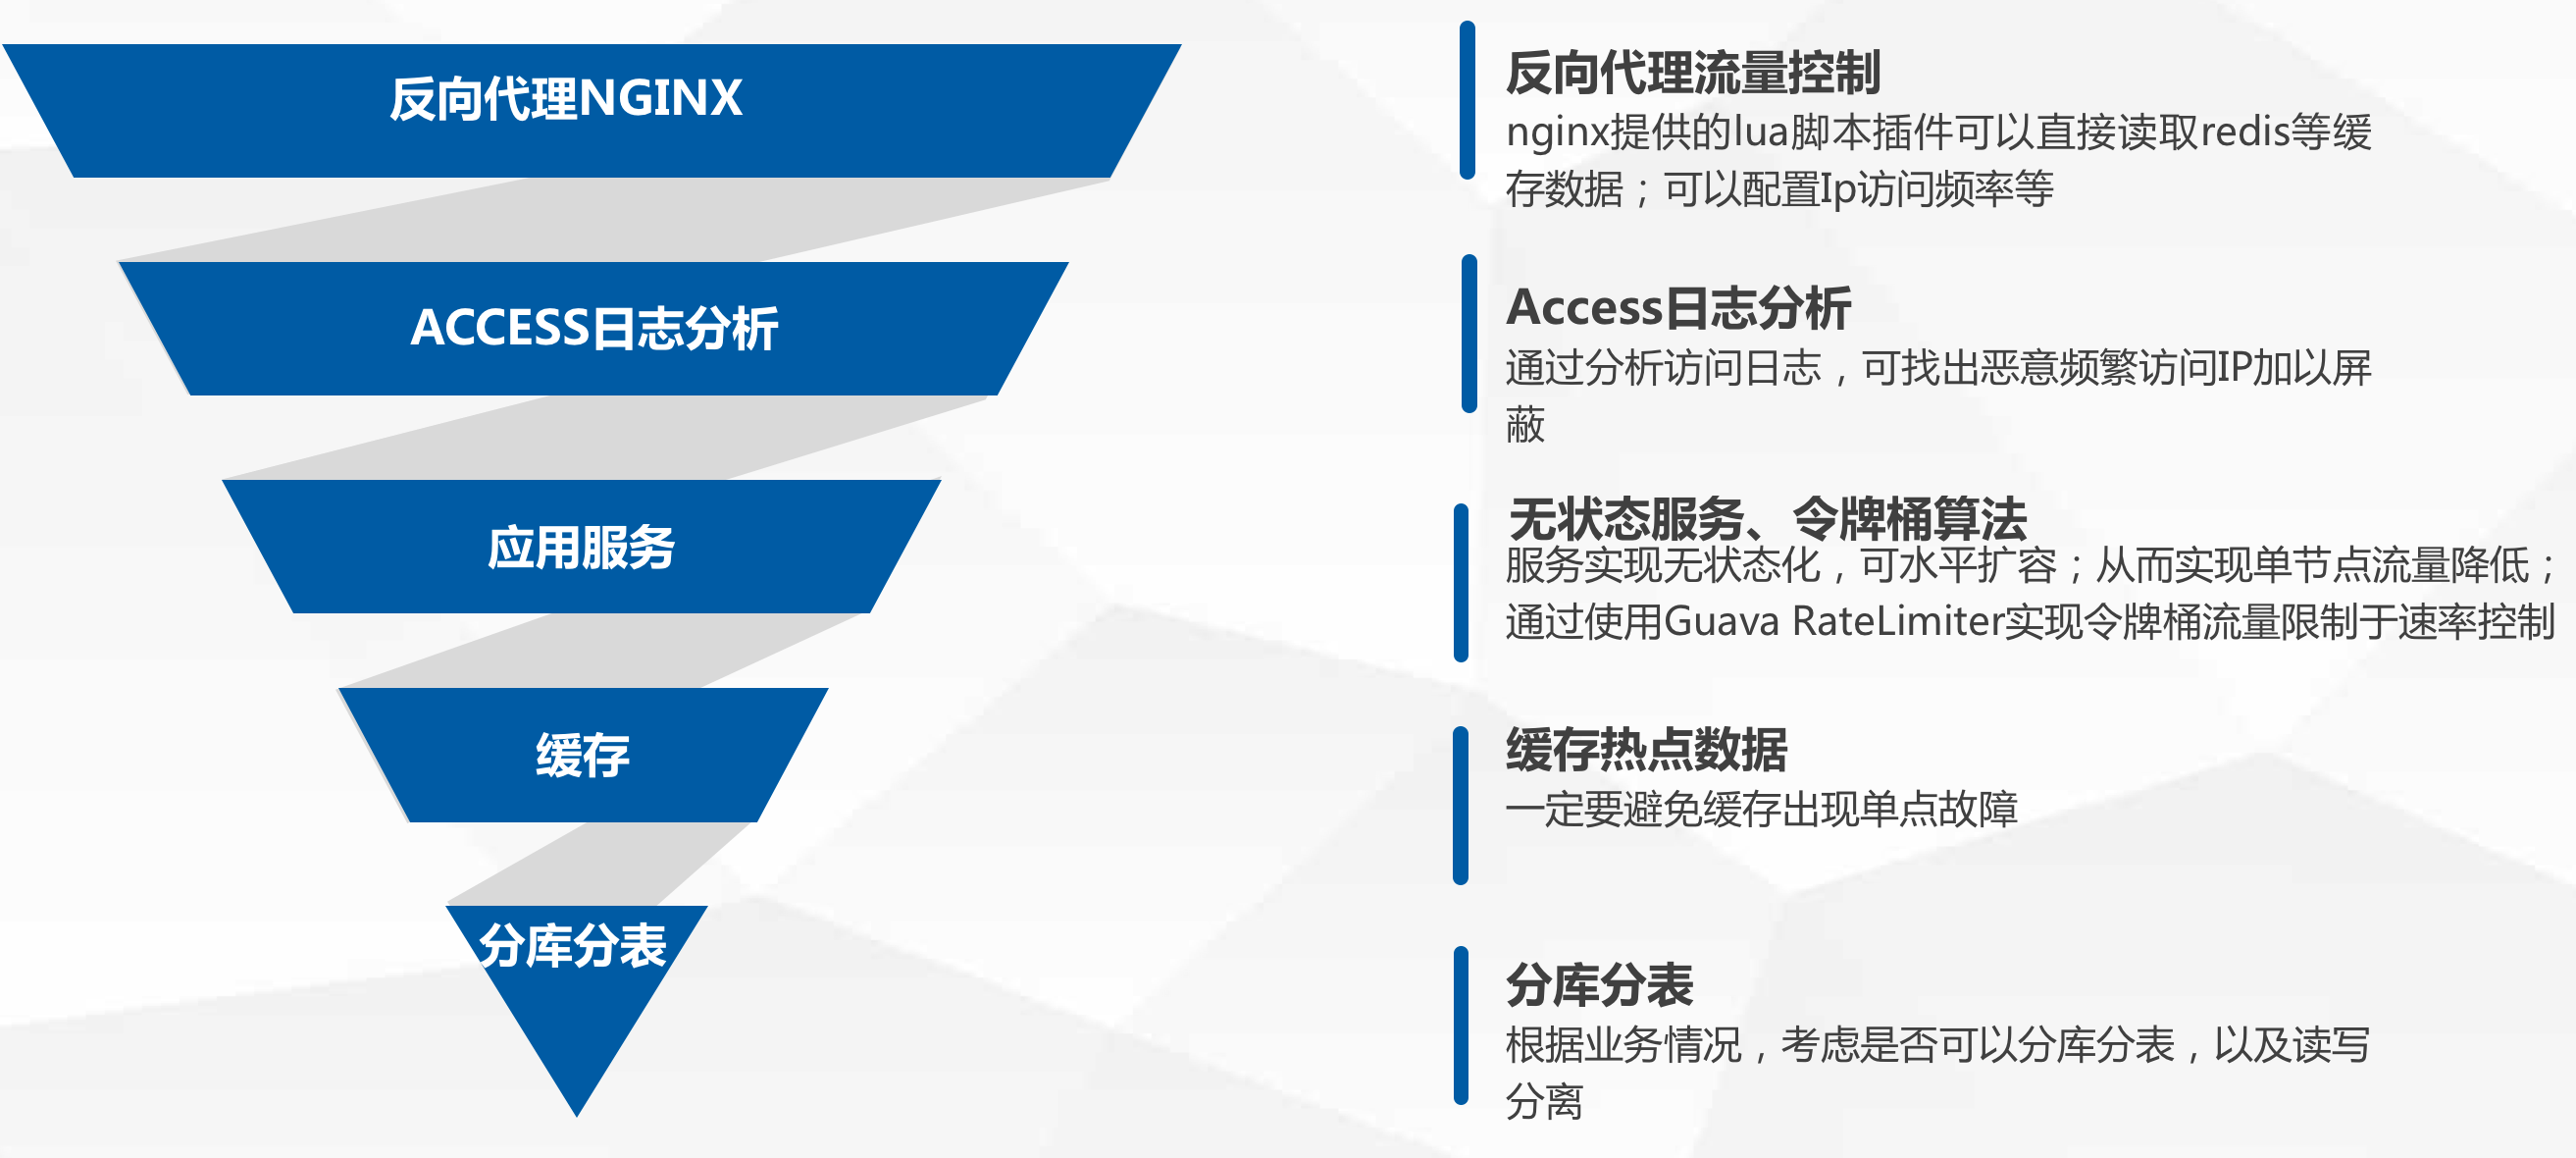
使用令牌捅算法进行限流
guava库里的RateLimiter类内部采用令牌捅算法实现.
本人实现了一个基于Guava的Spring Boot Starter,参见ratelimiter-spring-boot-starter
显然,该方式是最快捷且有效的,单节点模式下,使用RateLimiter进行限流一点问题都没有。但分布式系统总请求就是节点数x400/s,限流效果失效。
使用redis进行限流
使用redis进行限流,其很好地解决了分布式环境下多实例所导致的并发问题。因为使用redis设置的计时器和计数器均是全局唯一的,不管多少个节点,它们使用的都是同样的计时器和计数器,因此可以做到非常精准的流控。
另外,可以使用Redis+Lua或者Nginx+Lua来实现。因为Redis是单线程模型,能确保限流服务是线程安全的。
分布式事务、分布式锁
分布式事务
分布式事务本质上是依赖于可靠的分布式消息系统,以及本地的数据库事务共同完成的。
![]()
![]()
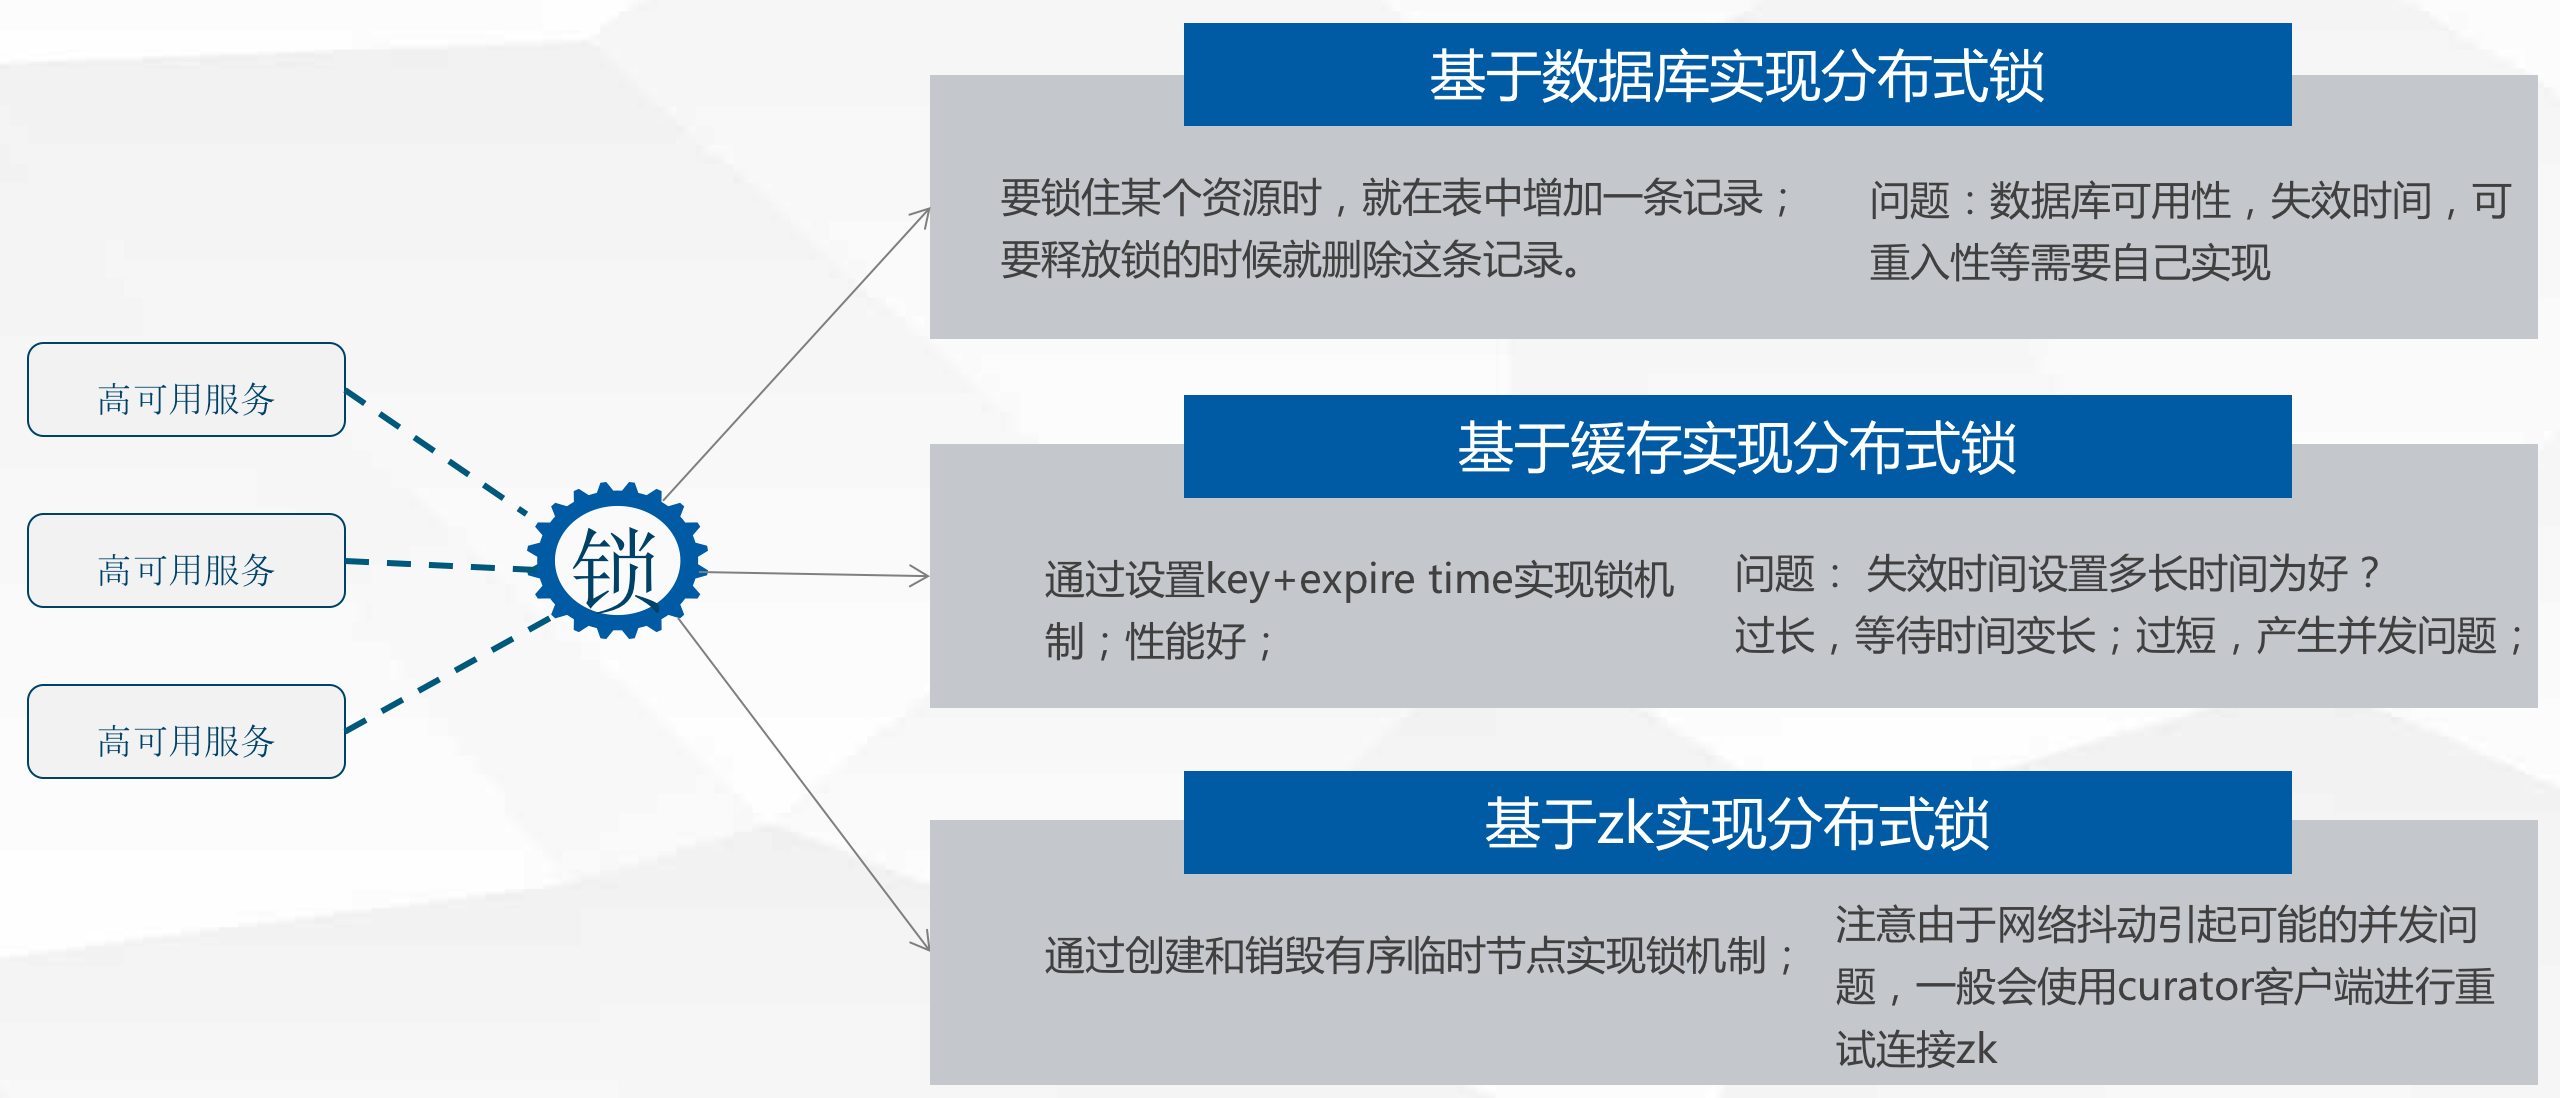
分布式锁
分布式存储与计算
分布式存储
持久化 - 分布式文件系统
持久化 - 分布式数据库
- [传统关系型数据库集群,如MySQL Cluster]
- Mongo
- Cassandra,HBase
非持久化 - 分布式缓存/消息系统
- Kafka
- [Redis]
分布式计算框架
任务工作管理
- Spring Batch
- Kubernetes Jobs
服务安全
- SpringCloud Security
Auto Scaling
打包部署和调度部署
- Spring Boot;
- Docker/Rkt、Kubernetes Scheduler&Deployment